
Back on January 7, I wrote about the first batch of wine I made to celebrate my brewing anniversary. To summarize the experience, it was very simple. After brewing for six years, making wine is astoundingly easy.
Now, before the crusty old vintners reading this pull the torches and pitchforks out of their closets to run me out of town, let me clarify by saying, making wine is easy. Making great wine is an art.
You could say the same about beer. Any guy off the street can boil some malt extract, throw in some hops, cool it and pitch the yeast. That won’t compete with Dogfish Head 90 Minute IPA.
However, my first batch of wine turned out much better than my first batch of beer.
Going From Brewing to Winemaking
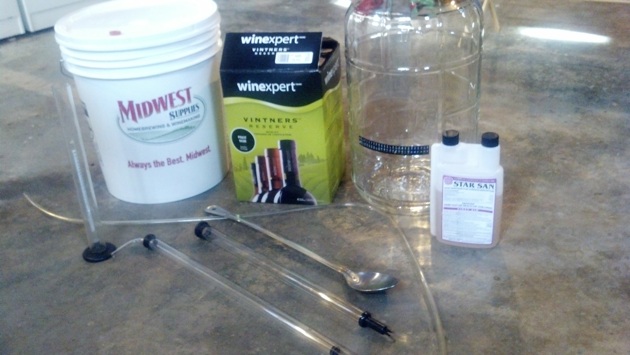
Equipment for winemaking. Not pictured: a corker and airlock.
If you’ve been brewing for any length of time, you likely have all the equipment you’ll need to make wine, save for perhaps a corker.
Here’s a list of the equipment you’ll need:
- Fermenting bucket
- Carboy
- Siphon
- Tubing
- Airlock
- Spoon
- Hydrometer
- Thief
- Sanitizer
- Corker
- Corks & bottles
- Bottling bucket
- Degassing device (optional)
That’s it, that’s the list. If you’re making wine from a kit, it’ll provide all the ingredients you need. Like with beer, as you get more advanced, you can start playing around with other flavorings, additives and nutrients.
The Winemaking Process
The process of making wine is straightforward. Each kit or recipe will have it’s own specific instructions, but here is the basic process:
- Since there is no boiling or heating of the wine, everything from the beginning needs to be sanitized. I recommend StarSan.
- If using grape extract, dilute the extract to six gallons in your primary fermenting bucket.
- Pitch the yeast.
- Close it up with an airlock. Store the bucket in darkness between 70 and 75 degrees Fahrenheit.
- About a week later, rack it into a carboy.
- After another 10 days, or when fermentation has pretty much stopped (see your instructions to determine the final gravity), add the fining agents and stabilizers.
- Degas the wine (more on this later).
- Wait another two weeks.
- Bottle it up.
The advantage to making wine over beer is that there is no steeping or boiling involved. There are no temperatures or efficiencies to worry about. The hard work in making wine is in growing the grapes. As a home vintner, that’s taken care of for you.
Now, there is one part of the process that is a complete pain in the ass if you don’t have the right equipment:
Degassing the Wine
During fermentation, yeast eat sugar and produce alcohol and carbon dioxide. Most of the CO2 escapes into the air, which is why you need an airlock to prevent the fermenter from exploding.
However, not all of the CO2 escapes. Some of it remains dissolved in solution. In beer, this isn’t a problem because we end up conditioning it at the end. Unless you are drinking champagne or sparkling wine, prickly carbonation is not a desirable characteristic in wine.
There are three ways you can get the CO2 out of your wine:
- Let it sit for a year until all the CO2 escapes on its own.
- Agitate (stir) the wine until all the CO2 is released.
- Pump the CO2 out with a vacuum.
At one point, the instructions that came with my kit told me to “stir vigorously for 2 minutes to disperse the stabilizers and drive off CO2.” Then I was to add the stabilizers and “stir vigorously for another two minutes.”
Unless I was the Six Million Dollar Man and turned my hand into a bionic drill bit capable of excavating a hole to the Earth’s molten core, there is no way that I could stir that wine vigorously enough to completely remove all the gas in four minutes.
I didn’t have any pumps or spoons specifically designed for the task, so I improvised by attaching a short piece of tubing to the end of a bit on my cordless drill. After at least an hour’s worth of stirring and agitating, it still wasn’t completely degassed.

Whip it. Whip it good.
Nearing the end of my rope and ready to make the world’s first sparkling pinot noir, I happened to be in Grape and Grains when my conversation with owner Ken Anderson turned to wine. I told him I was making my first ever wine and he showed me a nifty contraption he had attached to an air compressor.
This contraption created a vacuum that would suck all the CO2 out of the wine in one to two hours. He said I was welcome to bring my carboy in and hook it up. Jackpot! I brought my carboy in the next day.
Ken hooked up the vacuum, I left to run some errands, came back a couple hours later and voilà! Done. Gas-less wine. Many thanks to Ken!
If you don’t have an air compressor, there are a few other options. Brake line bleeders apparently do quiet well. You can also buy a hand pump and get a good workout. There are stirring sticks that you can attach to a hand drill.
It just takes a little resourcefulness, or knowing another more advanced wine maker, and you can get the job done. All I know is, if I were to get serious about wine, I would invest in an automated way to get the gas out of it. It’s well worth it.
The Review

It’s wine!
The wine kit I made was a Winexpert Vintner’s Reserve Pinot Noir from Midwest Brewing Supply. The color was ruby red with impressive clarity. It had a bright, musty nose with an alcohol presence. I also had aromas of tropical fruit, particularly kiwi and mango.
The flavor was light and refreshing, just what I was hoping for in a spring to summer house wine. It burst with cherries and strawberries, rounding out with caramel coming in afterward.
It has an acidity to it, reminiscent of a European pinot, and finished clean and dry. There was a slight bite at the end, likely from the acidity, though perhaps there was a small residual amount of carbon dioxide left. Damn degassing!
The wine turned out surprisingly decent, considering it’s my first ever batch. I thought it was refreshing and drinkable, which is a desirable quality since I now have 28 bottles to make it through.
It totally grew on me as I drank more of it. I feel like it will be a versatile house wine for every day drinking. Great for the upcoming spring and summer.
The kit costs about $65, which comes out to slightly more than $2/bottle. That’s a great price to produce a house wine. Like any craft, I’m also sure you can get to the point where you can produce wine that’s every bit as good as most that you can buy in the store.
I also know that you can procure straight juice, not from concentrate. And as with any juice, fresh is always better than concentrate. While it’s more expensive that way, I’m sure the finished product will be that much better. My next batch will be from straight juice, and I look forward to comparing that to the extract wine I made.
I’m pretty sure I’ll do this again once I make a dent in my current supply. It’s easy, makes pretty good wine at a very reasonable cost, and creates a hit at parties. After all, that’s why we make this stuff, right?
